If you want to transform yarn into lifelike hair for your crafts, follow this step-by-step guide on how to brush out yarn to make hair.
Contents
Key Takeaways:
- Cut threads of yarn in the desired color and length.
- Attach the threads to the desired areas of the crocheted piece.
- Use a slicker brush to brush out the yarn, starting from the tips and working your way up.
- Trim any wispy bits sticking out to achieve the desired look.
- Experiment with different brushing techniques to create a fluffy, hair-like texture.
Gather the Necessary Supplies
Before you start brushing out yarn to create hair, make sure you have all the necessary supplies on hand. Here is a list of items you will need:
- Yarn: Choose yarn in the color and texture you desire for the hair. It’s best to use a yarn that is smooth and easy to brush, such as acrylic or synthetic yarn.
- Scissors: You’ll need a pair of sharp scissors to cut the yarn to the desired length.
- Crocheted Piece: Prepare your crocheted piece, whether it’s an amigurumi doll or a craft project, to attach the yarn hair.
- Needle and Thread: Use a needle and thread to secure the yarn to the crocheted piece. Choose a thread that matches the color of the yarn for a seamless look.
- Slicker Brush: A slicker brush is a grooming tool with fine, short wires that are perfect for brushing out yarn. It will help create a fluffy and realistic hair-like texture.
Once you have gathered all the supplies, you are ready to start brushing out the yarn and bringing your craft project to life!
Table: Necessary Supplies
| Supplies | Description |
|---|---|
| Yarn | Choose yarn in the desired color and texture for the hair |
| Scissors | A pair of sharp scissors to cut the yarn |
| Crocheted Piece | Prepare your crocheted piece to attach the yarn hair |
| Needle and Thread | Secure the yarn to the crocheted piece |
| Slicker Brush | A grooming tool to brush out the yarn |
With these supplies at your fingertips, you’ll have everything you need to create stunning hair with yarn for your craft projects. So, let your creativity flow and enjoy the process of bringing your creations to life!
Prepare and Attach the Yarn
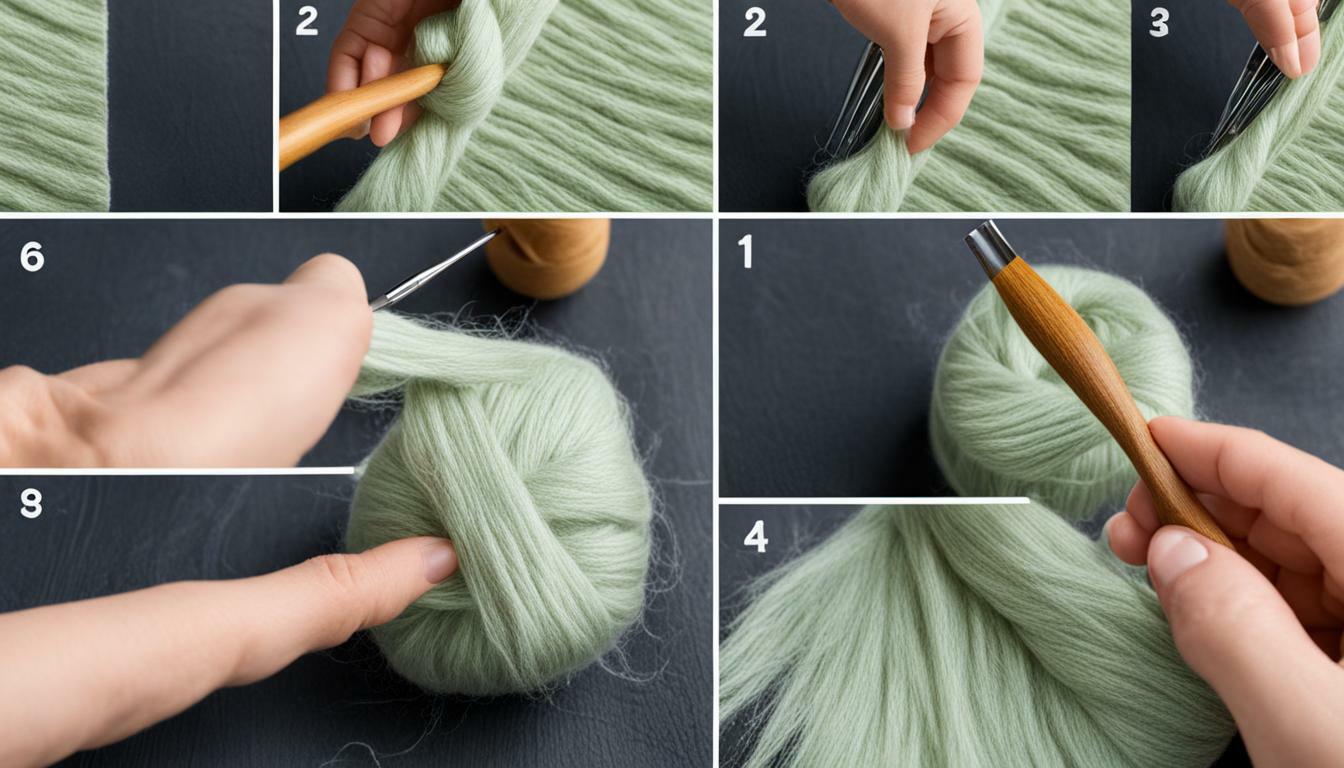
To begin creating hair with yarn, you need to prepare the yarn by unraveling it and attaching it to specific parts of your crocheted piece. Here’s a step-by-step guide on how to do it:
- Choose the color and length of yarn that you want for the hair. Cut several threads of yarn to the desired length, keeping in mind the length of the hair you want to achieve.
- Decide which areas of your crocheted piece will have hair. These areas can include the chest, paws, muzzle, and eyebrows, depending on the project.
- Take one thread of yarn and unravel it gently using your fingers. You can separate the yarn into smaller strands to create a more realistic look.
- Securely attach the unraveled yarn to the desired part of your crocheted piece using a tapestry needle or crochet hook. Make sure to leave a small tail of yarn at the starting point for added security.
- Repeat the process with the rest of the cut yarn threads, attaching them to the designated areas.
By following these steps, you will have successfully prepared and attached the yarn for your hair. The next step is to brush it out to achieve the desired texture.
Attaching Yarn Hair to a Crocheted Amigurumi
If you’re working on an amigurumi project, such as a doll or stuffed animal, you can use the table below as a guide to determine where to attach the yarn hair for different parts of the body:
| Body Part | Area for Yarn Hair |
|---|---|
| Chest | Around the neck area and down the front |
| Paws | Around the wrists and partially up the arms |
| Muzzle | Above the eyes and down the snout |
| Eyebrows | Above the eyes |
Remember to adjust the attachment areas based on the size and design of your crocheted piece. This table serves as a general guideline, but you can get creative and experiment with different styles and patterns.
With the yarn attached, you are now ready to move on to the next step: brushing techniques for yarn hair. This will help you achieve the perfect hair-like texture for your craft project.
Brushing Techniques for Yarn Hair
Once the yarn is attached, it’s time to use the proper brushing techniques to transform it into realistic hair. To get started, gather your supplies, including a slicker brush that has fine, closely spaced bristles. This type of brush is ideal for creating a fluffy texture with yarn. Begin by holding the crocheted piece securely and gently brushing through the yarn from the tips to the roots.
While brushing, you may encounter tangles or knots in the yarn hair. To effectively brush out tangles, start by carefully separating the tangled strands with your fingers. Once the knots are loosened, continue brushing gently but firmly to smooth out the tangles. If the tangles are particularly stubborn, you can use a detangling spray or conditioner to make the brushing process easier.
As you continue brushing, periodically check the overall appearance of the yarn hair. Look for any inconsistencies or areas where more texture is needed. If you notice any wispy bits sticking out, use a pair of sharp scissors to carefully trim them to achieve a neater and more polished look. Take your time while trimming, ensuring that you are only cutting the excess yarn and not the crocheted piece itself.
To add dimension and further enhance the realism of the yarn hair, consider using different brushing techniques. For example, you can use a comb or a teasing brush to create volume and texture in specific areas. Experiment with various brushing methods to achieve the desired effect, whether it’s smooth and silky hair or wild and untamed locks.
Table: Brushing Techniques for Yarn Hair
| Technique | Description |
|---|---|
| Brushing from tips to roots | Gently brush the yarn hair from the tips to the roots to create a fluffy texture. |
| Separating tangles | Carefully separate tangled strands with your fingers before continuing to brush. |
| Trimming wispy bits | Use sharp scissors to trim any excess yarn sticking out for a neater appearance. |
| Using different brushing tools | Explore the use of combs or teasing brushes to add volume and texture to specific areas. |
By following these brushing techniques, you can transform plain yarn into lifelike hair for your craft projects. Remember to approach the brushing process with patience and care, ensuring that each stroke enhances the overall look and feel of the yarn hair. With practice, you’ll master the art of brushing out yarn and create stunningly realistic hair for your crocheted creations.
Trim and Style the Yarn Hair
After brushing out the yarn to create a full and fluffy texture, it’s time to trim and style the hair for the perfect finishing touch. Trimming the yarn hair is essential to achieve a neat and polished look. Start by examining the entire piece and identifying any stray or uneven strands that need to be trimmed. Using a sharp pair of scissors, carefully snip away the excess yarn, working in small sections to ensure precision. Remember to take your time and trim gradually, as it’s easier to remove more yarn if needed than to add it back.
Styling Tips
Once the yarn hair is trimmed, it’s time to get creative with styling. You can choose to leave the hair as is for a natural look, or experiment with different hairstyles to suit your craft project. Here are some styling tips to consider:
- Create curls: To add curls to the yarn hair, wrap small sections around a thin cylindrical object like a pencil or dowel rod. Secure the wrapped yarn with a small drop of fabric glue or a discreet stitch. Leave the yarn wrapped for a few hours or overnight to set the curls, then carefully remove the cylindrical object for bouncy, textured curls.
- Add braids: Braiding the yarn hair can create a realistic and intricate look. Divide the yarn into equal sections and braid them tightly, securing the ends with fabric glue or a small stitch. You can experiment with different braid styles, such as French braids or fishtail braids, to add depth and dimension to your craft project.
- Try accessories: Enhance the yarn hair with accessories like ribbons, bows, or beads. Simply attach them to the yarn strands using fabric glue, stitches, or small hair clips. This will add a touch of personalization and make your craft project truly unique.
Remember, styling the yarn hair is where your creativity can truly shine. Don’t be afraid to experiment and try different techniques to achieve the desired look. Whether you’re creating a doll, amigurumi, or any other craft project, the styled yarn hair will bring character and charm to your creation.
| Tip: | When trimming and styling the yarn hair, always refer to your craft project’s overall design and the desired look you want to achieve. Take inspiration from real hairstyles or reference images to guide you in creating a more realistic and visually appealing finished piece. |
|---|
Conclusion
By following this step-by-step guide, you can easily brush out yarn to create realistic hair and bring your crafts to life. To get started, cut threads of yarn in your desired color and length. Attach these threads to the appropriate areas of your crocheted piece, such as the chest, paws, muzzle, and eyebrows.
Once the yarn is securely attached, it’s time to brush it out for that fluffy, hair-like texture. Using a slicker brush, gently brush the yarn starting from the tips and working your way up. This will help create volume and give your yarn hair a more natural appearance. Be sure to brush out any tangles or knots along the way for a smooth finish.
After brushing, take a moment to trim any wispy bits of yarn sticking out. This step will help shape and refine the final look of your yarn hair. Feel free to get creative and experiment with different styles and lengths to achieve the desired effect for your craft project.
With your newly brushed and styled yarn hair, you are now ready to bring your creations to life. Whether you’re making dolls, stuffed animals, or any other yarn-based craft, this technique will add that extra touch of realism and make your projects standout. So gather your supplies, follow the steps outlined in this guide, and let your imagination run wild!
FAQ
How do I brush out yarn to make hair?
To brush out yarn to make hair, start by cutting threads of yarn in the desired color and length. Then, attach the threads to the desired areas of the crocheted piece, such as the chest, paws, muzzle, and eyebrows. Once all the threads are attached, use a slicker brush to brush out the yarn, starting from the tips and working your way up. This will create a fluffy, hair-like texture. Finally, trim any wispy bits sticking out to achieve the desired look.
What supplies do I need to brush out yarn for hair?
The essential supplies needed to brush out yarn for making hair include yarn in the desired color and length, a crocheted piece to attach the yarn to, and a slicker brush for brushing out the yarn. Additionally, you may also need scissors to trim any wispy bits sticking out.
How do I prepare and attach the yarn for brushing?
To prepare the yarn for brushing, unravel the yarn from its original skein or ball form. Next, cut the threads of yarn in the desired length and securely attach them to the desired areas of your crocheted piece using a needle and thread. Make sure to place the threads in strategic locations such as the chest, paws, muzzle, and eyebrows to create a natural-looking hair effect.
What are some brushing techniques for yarn hair?
When brushing yarn hair, it’s important to start from the tips and work your way up to avoid creating tangles. Use a slicker brush to gently brush out the yarn in small sections, moving in one direction. If you encounter any tangles or knots, gently detangle them with your fingers or a wide-toothed comb before continuing to brush. This will help create a fluffy, hair-like texture.
How do I trim and style the yarn hair?
After brushing out the yarn hair, carefully inspect it for any wispy bits sticking out. Using sharp scissors, trim these bits to achieve a neater and more polished look. Additionally, you can style the yarn hair by shaping it with your fingers or using styling tools like hairpins or small hair elastics. Experiment with different styles to create unique looks for your craft project.
Leave a Reply